


How to Set Up a Dedicated Minecraft Server on Linux
Minecraft is a popular sandbox and adventure game that offers creative and survival challenges as you explore an infinite world with endless modification possibilities. It was created by Mojang Studios and was first made publicly available in May of 2009. Minecraft was officially released on November 18, 2011.
Worldwide monthly active users for Minecraft reached 40 million in June of 2016. That number climbed to 140 million as of March 2021. In addition to a large number of monthly users, it is also the most downloaded game of all time.
Previously, you learned how to create a Minecraft server in five steps for your virtual private server (VPS). This time around, you will learn how to set up a Minecraft server using dedicated Linux hosting.
Benefits of Having a Dedicated Server for Minecraft on Linux
With a dedicated server, you have sole use and control over the server resources. Processing power, memory, and storage are available specifically for your gameplay without noisy neighbors (as in shared hosting) or running virtualization (as in cloud dedicated or bare metal servers). You achieve improved performance by having this kind of control.
Additionally, all of your mods (additions to the game), plugins, and security settings are under your complete control. You can set up your Minecraft server on Linux the way you want without other users making changes to your settings.
Server Requirements
Per the Fandom wiki, there are several configurations available, including both the minimum and optimal server configurations. Here are the minimum server requirements to run a Minecraft server on Linux:
- One to five players.
- Intel Pentium 4 2.0 GHz or AMD Athlon-based CPUs and better.
- 512 MB of RAM.
- 2 GB of available HDD space (5GB if you are doing frequent backups).
- Internet connection of 3 Mbps upload speed and 2 Mbps download speed.
Here are the optimal server requirements to run a Minecraft server on Linux:
- Twenty or more players.
- Intel i5 or i7 CPUs or AMD Ryzen 5 or 7-based CPUs and better.
- 6 GB of RAM.
- 35 GB of available HDD space.
- Internet connection of 30 Mbps upload speed and 15 Mbps download speed.
For the purposes of this article, Minecraft was installed on a Liquid Web Dedicated server with the following configuration:
- Intel Xeon CPU E3-1230 v5.
- 4 Core @ 3.40GHz.
- 16 GB RAM.
- 500 GB SSD.
- Operating system is CentOS 7 64-bit.
Steps to Set Up a Dedicated Minecraft Server on Linux
Step 1: Connecting to Your Server
Connect to your server’s console or connect remotely via secure shell (SSH). If you are connecting remotely via SSH, use the following command to log in as the root user.
ssh root@serveripaddressIf this is your first time connecting to this server, you will be prompted to confirm you want to connect to a new, previously unknown host. Type yes,and you will be prompted for the root password. Once you enter it, you are logged in as root.
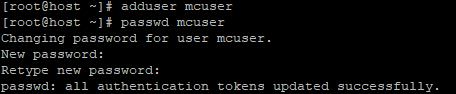
It is recommended to create a separate user account so that if your Minecraft server is compromised, the exploiter does not have access to the root user account. Use the following command to create a user named mcuser.
adduser mcuserThe following command is to set the password for our new user.
passwd mcuserYou will be prompted to enter and confirm the password.
Step 2: Update Package Repository and Install Java
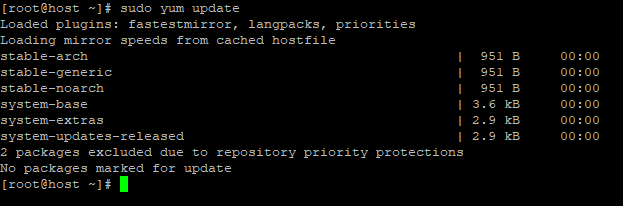
You will need to install Java. First, ensure that your package repository is updated using the following command.
Next, install Java using the following commands.
You can check that it was installed successfully by confirming the Java version.
java -versionYou will see the following output.

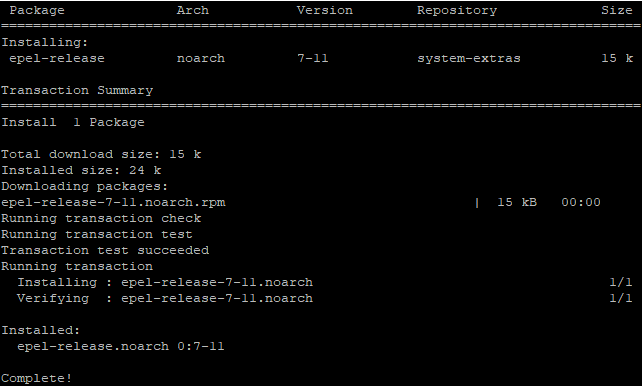
In order to install Java 16, you need to ensure the server is aware the package is available by updating the epel repository. You will update it with the command below.
yum install -y epel-releaseIf it is not already installed, you will see the following output.
Next, you will install the latest version of Java, which is currently Java 16. Use the following command to install the latest version of Java.
yum install -y java-latest-openjdk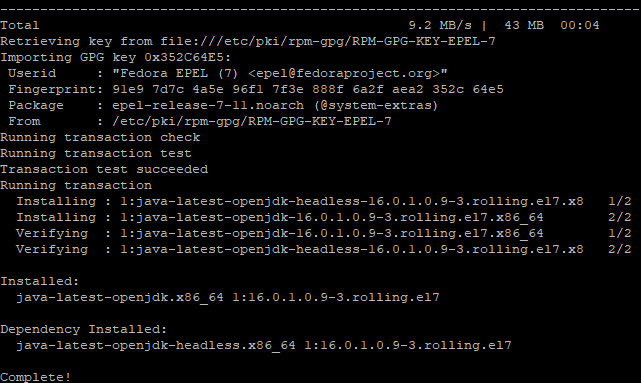
While Java 16 is installed, you still need to set it as the default in order for the server to run applications using the latest version. You can accomplish this by using the following command.
alternatives --config javaYou will be presented with the versions of Java installed on your server, each with a corresponding number. Choose the appropriate number and press Enter.
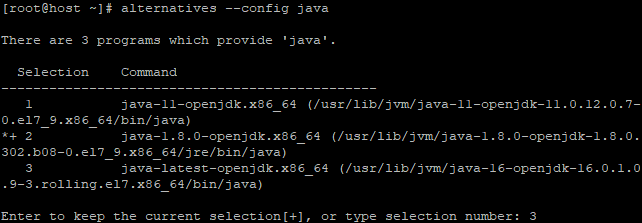
If you run java -version again, it will show the version number you selected.

Step 3: Screen Installation
Install Screen, an application for the console that keeps your server running when you are not connected. To install it, use the following command.
sudo yum install screenYou will confirm install as with installing Java. If it is already installed, you will be informed and returned to the prompt.

Step 4: Set Up Your Minecraft Server on Linux
Start by switching users and creating a directory for your Minecraft files. You can call your directory mineserver.
su - mcuser
mkdir mineserver
You will move to that directory with the following command.
cd mineserver
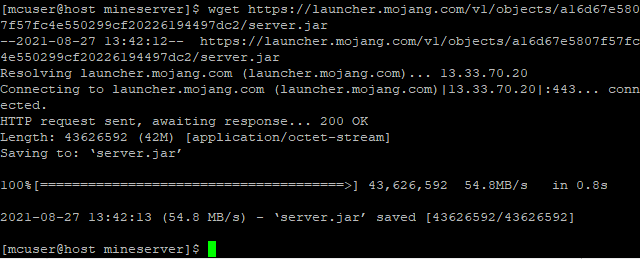
Next, you will download the needed configuration files for Minecraft. Visit the Minecraft Java Edition server page, right-click on the Minecraft server .jar link, and copy the link address.
To download the files, you need to use the wget command along with the link to the files. It should look like this.
wget https://launcher.mojang.com/v1/objects/a16d67e5807f57fc4e550299cf20226194497dc2/server.jarAfter running the command, the output will let you know the files were saved.
Step 5: Start Your Minecraft Server and Play
Start your Minecraft server for the first time by running the following command.
java -Xmx1024M -Xms1024M -jar server.jar noguiBefore the server can start, you will need to accept Mojang’s license terms. To do this, you will need to open the document in your chosen text editor. The example below will use Vim. The following command will open the document.
vim eula.txt- Press i to enter Insert mode.
- Change eula=false to eula=true.
- Press Escape to exit Insert mode.
- Type :wq to save your changes and exit the editor.
Once you have accepted the terms, you can start a Screen session and start the Minecraft server again. Type the screen command to start a new terminal session within your current session. Then, type the command you used before to start the Minecraft server.
screen
java -Xmx1024M -Xms1024M -jar server.jar nogui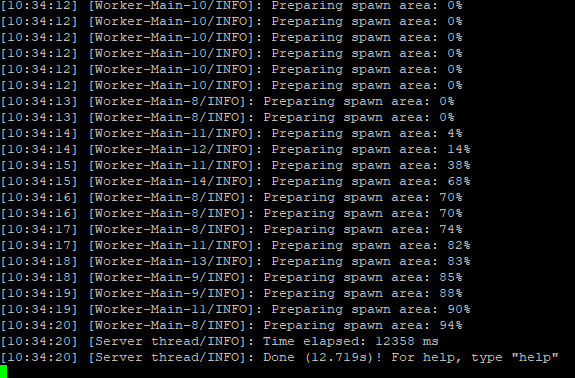
A new random world will be created once booting is completed.
You can press Ctrl+A+D to detach from this Screen session, which will place you back into the original terminal session you had while leaving Minecraft running inside the detached screen. You can log out without stopping the process or use screen -r to reattach it and bring it back to the foreground.
To stop your Minecraft server, type the stop command from the Minecraft Screen session and press Enter.
Final Thoughts
You are now ready to play Minecraft on your newly created Linux Minecraft server. Joining the server is easily done by using your direct IP address.
Managed dedicated server hosting is available through Liquid Web for you to set up a Minecraft server in Linux. You can contact us today to get your very own server and follow this tutorial once it is built.
Related Articles:


About the Author: Ronald Caldwell
Ron is a Technical Writer at Liquid Web working with the Marketing team. He has 9+ years of experience in Technology. He obtained an Associate of Science in Computer Science from Prairie State College in 2015. He is happily married to his high school sweetheart and lives in Michigan with her and their children.


Our Sales and Support teams are available 24 hours by phone or e-mail to assist.
Latest Articles
How to Clone a Drupal Site to Another Domain
Read ArticleTop Eight Virtualization Security Issues and Risks
Read ArticleAccessing Man Pages on Ubuntu 16.04 LTS
Read ArticlePremium Business Email Pricing FAQ
Read ArticleMicrosoft Exchange Server Security Update
Read Article