


How to Set Up and Use Cloud Block Storage
What is Cloud Block Storage?
Cloud Block Storage provides additional hard drive space for your Private Cloud Hosted Server with just a few clicks. The space is not pre-formatted but rather, it is a raw block device. The simplicity of providing a raw block device on the cloud means that you can mount and format the space on your server however you would like, with whatever filesystem is appropriate for your needs. This does entail a small amount of work getting the space into a usable state which we will address in this article.
Warnings and Caveats
When using an SBS drive, there are a few things to be aware of:
- WARNING: NEVER CROSS LINK ACBS (Cloud Block Storage) DRIVE TO A FILE SYSTEM WHICH DOES NOT SUPPORT THAT FEATURE. IF YOU DO NOT HAVE A CLUSTERED FILE SYSTEM, YOU WILL CORRUPT THE DATA ON THE CBS WHEN CROSS-ATTACHING IT.
- WARNING: The Cloud Block Storage is designed and intended for storing backups or other static files. Using the CBS drive to host publicly accessible files and content causes latency along the network connection between the Block storage drive and your server, causing significant slowing. The slowing due to excessive read/writes across the network cannot be cleared without rebooting the drive. CBS should never be used to host websites or other highly active files.
- SBS is currently limited to Zone B - US Central and Zone C - US Central.
- If you are used to Amazon's Elastic Block Store (EBS), you may be tempted to use RAID 0 on multiple volumes to speed up reads and writes. While that technique is useful for Amazon's product, it is not needed with SBS. SBS's backend is fully distributed to prevent the issues that individual EBS volumes can run into. If you do use RAID 0 across multiple SBS volumes, it will not have the desired effect. This will actually create additional complexity and could interfere with the consistency of SBS snapshots (a planned future feature).
- Ubuntu 10 and Debian 6 servers will have to mount the UUID of the device in fstab. All others will find the ID in /dev/sbs.
- If you are having trouble attaching a volume to a server, the server may need to be rebooted from manage to attach a volume.
- Before you detach a volume from an instance in your manage interface, you MUST first unmount the device from within the server.
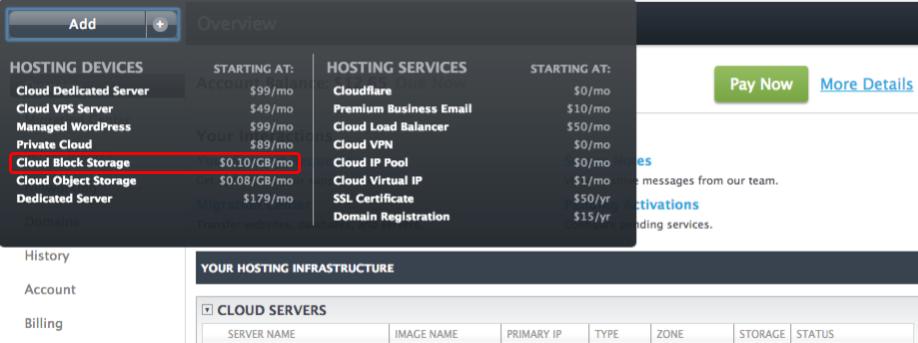
Adding Storage
First, in your manage interface, hit "Add" and then select "Cloud Block Storage".
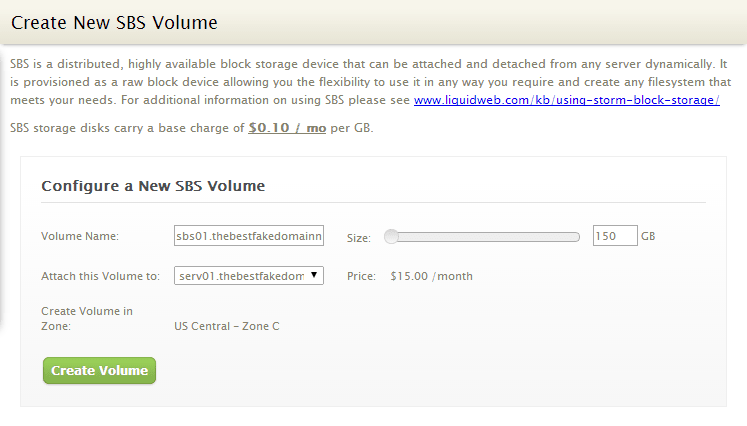
You will have to name your volume, which you can do in the Volume Name field. Then, choose the Size of the block storage volume, which starts at 5 GB and is available up to 15,000 GB. Next, pick which server to Attach this Volume to. And then finally click the Create Volume button.
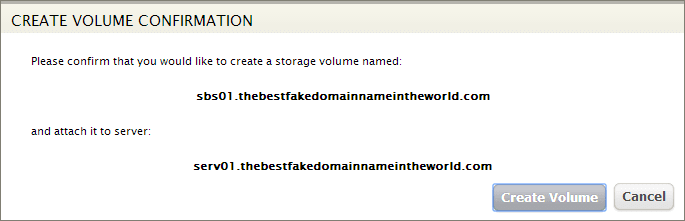
You will be asked to confirm your selection; click Create Volume:
The volume will soon be created and mounted to the server.
If you click on the volume itself, you will see a detail page for that volume. Each volume created has a Unique ID. You may want to keep this handy when mounting the drive on CentOS systems.
Mounting the Volume
Although the volume is now attached to the server as a device, the volume still needs to be formatted with a filesystem and mounted before it can be used. Cloud puts the device in /dev/sbs:
 [root@core ~]# ls /dev/sbs/
C1HBX2Next, use the "mkfs" command to add a filesystem to the device.
 [root@core sbs]# mkfs -t ext4 /dev/sbs/C1HBX2
 mke2fs 1.41.12 (17-May-2010)
 Filesystem label=
 OS type: Linux
 Block size=4096 (log=2)
 Fragment size=4096 (log=2)
 Stride=0 blocks, Stripe width=0 blocks
 9830400 inodes, 39321600 blocks
 1966080 blocks (5.00%) reserved for the super user
 First data block=0
 Maximum filesystem blocks=4294967296
 1200 block groups
 …
If you wish to mount the device to multiple servers, make sure to pick a filesystem type that supports server clustering, such as OCFS (Oracle Clustered File System). Adding a device to multiple servers is beyond the scope of this guide. You will need a directory to mount the device on.
mkdir /mnt/sbsTo mount the device, run this command.
mount /dev/sbs/C1HBX2 /mnt/sbs/
Now on most systems, you could mount the device directly in the /etc/fstab file.
/dev/sbs/C1HBX2 /mnt/sbs ext4 defaults,_netdev 0 0
On Ubuntu 10 and Debian 6 systems, you will need to grab the UUID of the device using the blkid command.
 [root@core ~]# blkid
 /dev/vda1: LABEL="/boot" UUID="32e7f110-e8c0-40a2-8a4a-6c9e7c2dfe83" TYPE="ext3"
 /dev/vda2: LABEL="SWAP-vda2" UUID="f7e08f56-f003-4aed-abd5-bda36ab20c6e" TYPE="swap"
 /dev/vda3: LABEL="/" UUID="d84078bb-5766-4de2-b5b5-7a478359469b" TYPE="ext3"
 /dev/vdb: UUID="ea1bc733-1491-4759-b8d5-052b091538ed" TYPE="ext4"
Note that /dev/vdb is the actual mount point of the device; the ID in /dev/sbs is a symlink. Next, add the following to /etc/fstab.
UUID=ea1bc733-1491-4759-b8d5-052b091538ed /mnt/sbs ext4 nofail,defaults 0 0Your volume will now mount to the /mnt/sbs directory every reboot.
Using SBS with Windows
The first step when adding block storage to Windows is the same as with a Linux server: create the volume, and attach it to the server in the manage interface.
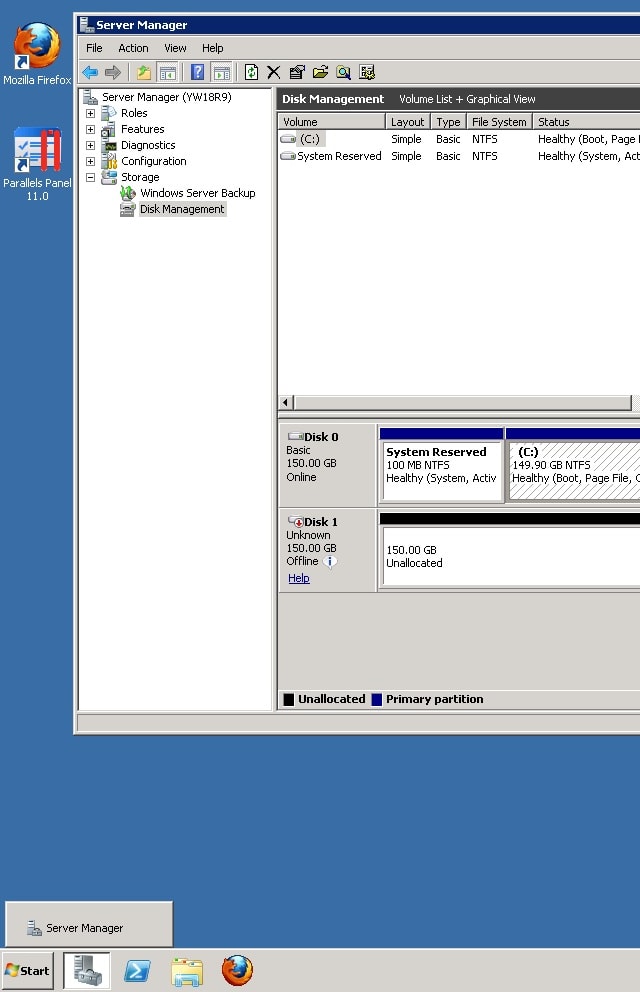
Next, bring the disk online by launching the Server Manager (next to the start button) and browse down to Storage → Disk Management.
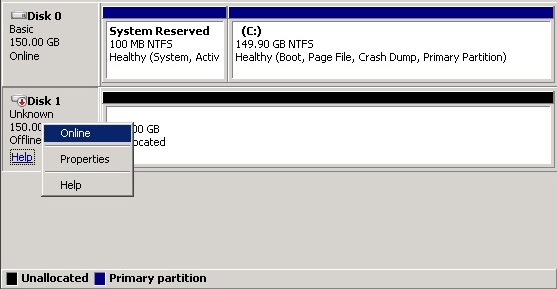
Right-click on the new Disk and select "online".
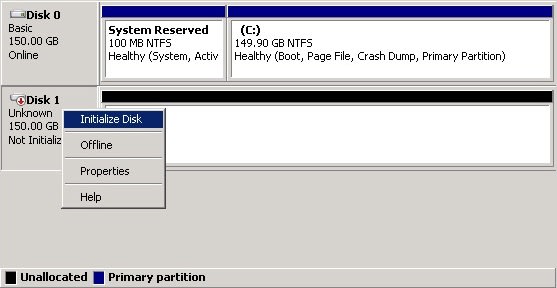
Right-click again on the new Disk and select "Initialize". If you are using a disk larger than 2 TB you will want to choose GPT; otherwise, you can simply confirm to initialize the disk.
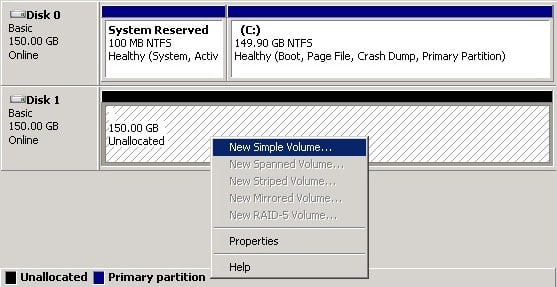
Right-click on the partition and select "New Simple Partition".
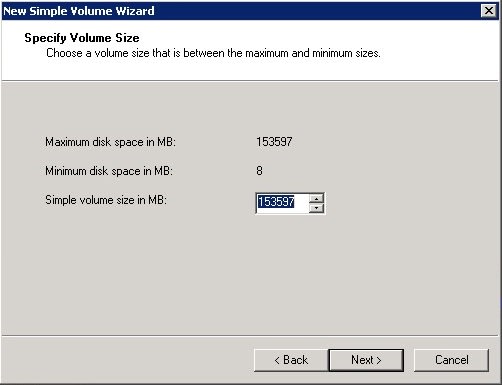
Click "next" through the welcome page. On "Specify Volume Size" you can specify a volume size other than the default. By default, it selects the entire disk.
Select the drive letter for the new volume.
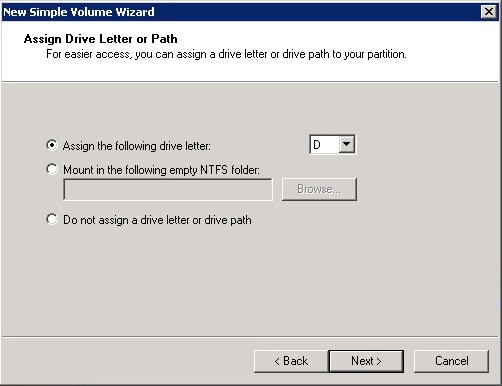
Now you can assign a label and other settings. Apart from specifying a Volume Label, the default settings should suffice.
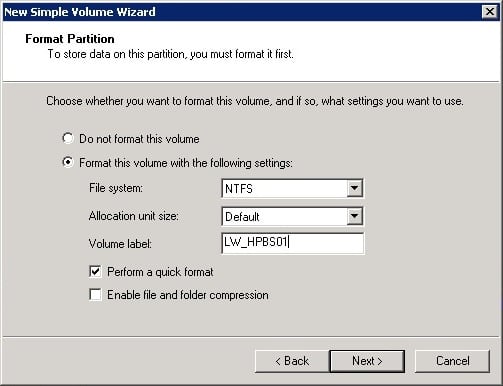
Click "Finish". Your SBS volume will now be available in Windows Explorer as the drive letter you specified.
Detaching a Windows Drive
As with Linux, your volume must be unmounted before it can be detached in the manage interface. Make sure you are unmounting the correct drive by running the following command from the terminal (accessible at Start > Run Command).
RunDll32.exe shell32.dll,Control_RunDLL HotPlug.dll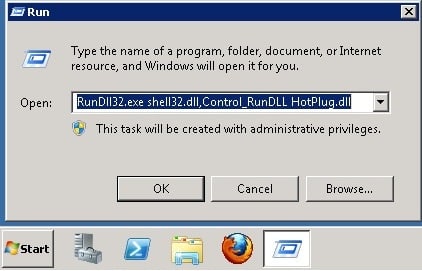
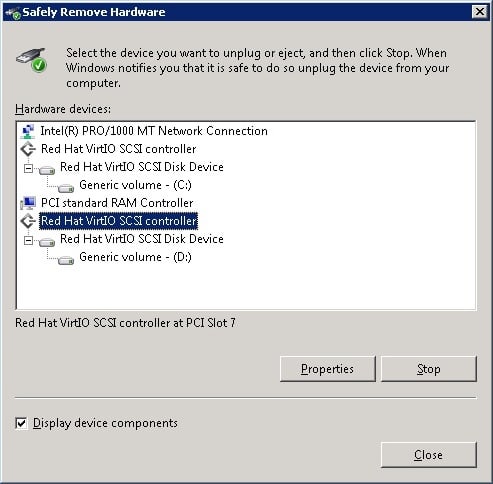
Here check "Display device components" and click Stop for the "Red Hat VirtIO SCSI controller" that corresponds to the drive you want to unmount. (Note: the system will prevent you from removing the C: SCSI controller.) Approve the "Safe to Remove Hardware" popup. It is now safe to detach the SBS from your manage interface.
As always, if you have any questions about this or any other Liquid Web product, do not hesitate to contact our support team.
Our Support Teams are replete with talented Linux technicians and System administrators who have intimate knowledge of multiple web hosting technologies, especially those discussed in this article.
If you are a Fully Managed VPS server, Cloud Dedicated, VMWare Private Cloud, Private Parent server or a Dedicated server owner and you are uncomfortable with performing any of the steps outlined, we can be reached via phone @800.580.4985, a chat or support ticket to assisting you with this process.
Related Articles:


About the Author: Patrick Hawkins
Patrick Hawkins is a former Test Engineer and Managed WordPress admin with Liquid Web


Our Sales and Support teams are available 24 hours by phone or e-mail to assist.
Latest Articles
How to Clone a Drupal Site to Another Domain
Read ArticleTop Eight Virtualization Security Issues and Risks
Read ArticleAccessing Man Pages on Ubuntu 16.04 LTS
Read ArticlePremium Business Email Pricing FAQ
Read ArticleMicrosoft Exchange Server Security Update
Read Article